Appendix or strong-side
These positions are common starting points because they keep the handgun on the belt and can support direct access with ordinary clothing.
Appendix, hip, behind-the-hip, shoulder, ankle, pocket and off-body carry all involve tradeoffs. The right answer is the position and equipment you can conceal, access, control and train with safely.
Reviewed by Troy Schneider, Owner, Texas Guns, Inc. — Type 07 FFL / Class 2 SOT; Texas LTC Instructor; NRA Pistol & Rifle Instructor and RSO; USCCA Defensive Shooting Instructor and RSO. Published September 2026.
The 60-second answer
A carry position is only one part of a system. A good setup secures the exact firearm, completely covers the trigger guard, stays attached during the draw, supports controlled access and works with the wearer’s body, clothing and routine. What feels unfamiliar for the first few days may become normal; sharp pain, numbness, unsafe shifting or compromised firearm control are signs to stop and change the setup.
These positions are common starting points because they keep the handgun on the belt and can support direct access with ordinary clothing.
An inch of position, a change in ride height or cant, or a properly fitted wedge or claw can change comfort and printing dramatically.
Walk, sit, stand, bend, reach and use a seat belt with an unloaded firearm before committing to a loaded carry setup.
Use an unloaded firearm for fitting and dry evaluation. Remove all ammunition from the room, verify the firearm is unloaded according to its manual, and keep the muzzle in a safe direction. Load and carry only after the complete system has been checked and you can operate it safely.
Visual position map
Clock references describe the waistband as if viewed from above: 12 o’clock is the front center, 3 o’clock is the wearer’s right hip, 6 o’clock is the center of the back and 9 o’clock is the wearer’s left hip. Left-handed carriers generally mirror the strong-side positions.
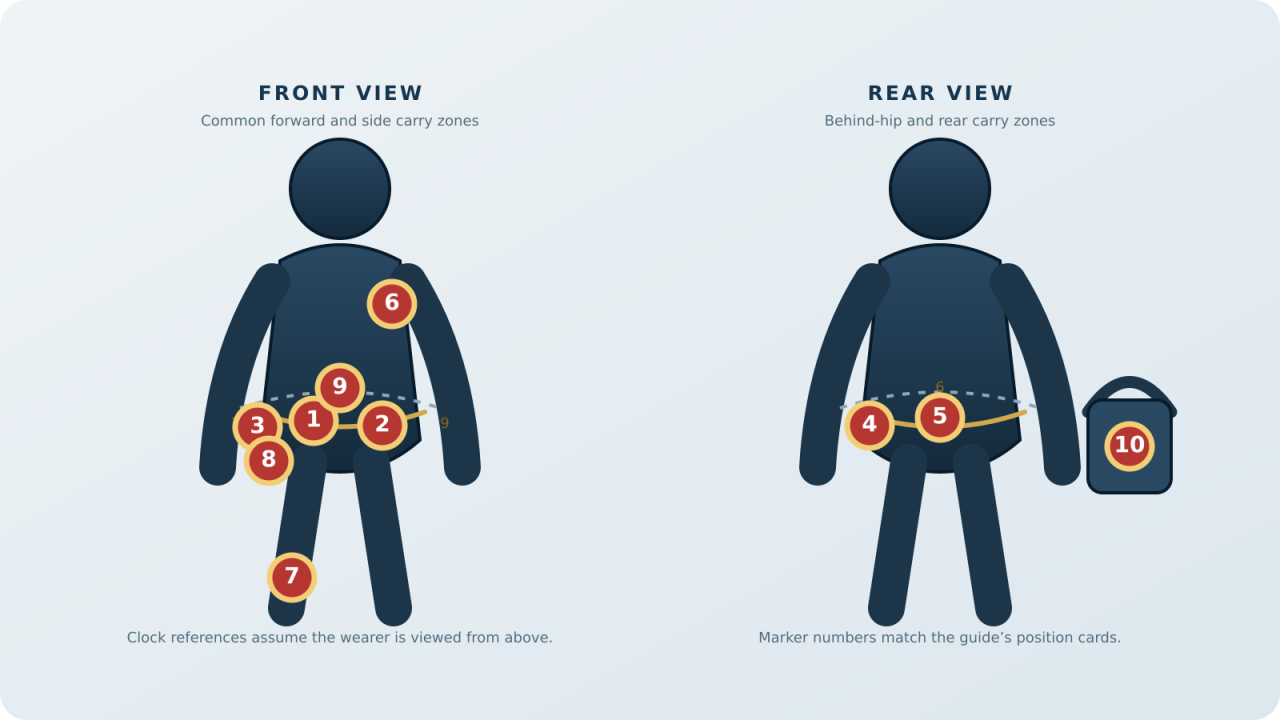
Position-by-position guide
These are general tendencies. Holster geometry, the exact handgun, belt stiffness and the person wearing the system can reverse an expected advantage.
Often conceals a compact handgun well and keeps the grip where the wearer can monitor it. Sitting comfort is highly dependent on ride height, position, torso shape and holster geometry.
Can help a wearer with limited strong-side shoulder mobility or long periods of seated work. The draw path crosses more of the body and demands careful muzzle management.
A familiar, natural draw location with good standing access. The handgun may sit on the widest point of the hip, which can increase printing or pressure.
Moves the handgun behind the hip’s widest point and can conceal well under a loose shirt or jacket. It is harder to see and may be trapped against a chair or vehicle seat.
This position can hide a handgun from a straight-on view, but it introduces meaningful access, retention and body-contact concerns—especially during a fall or while seated.
A properly fitted shoulder system can work for seated users and with structured outerwear. It requires a dedicated cover garment and strict awareness of muzzle orientation.
Ankle carry can hide a small handgun under suitable pants and may be reachable from some seated positions. Standing access is slower and requires balance and mobility.
Pocket carry can work with a small handgun when the pocket stays dedicated to the holstered firearm. The holster must cover the trigger and remain in the pocket during the draw.
A belly band can support clothing without a conventional belt, but soft systems vary widely. The firearm still needs rigid trigger protection, reliable retention and a stable draw location.
Off-body carry can solve clothing and mobility problems, but the carrier—not the body—now controls the firearm. The bag must remain under the carrier’s direct control at all times.
Holster fit matters
The handgun, holster, attachment, belt or support system, cover garment and wearer must work together. Changing one part can change retention, access, comfort and concealment.
The holster must prevent normal contact with the trigger while the firearm is fully seated. Soft material, broken structure or objects entering the holster can defeat that protection.
Use a holster made for the exact firearm and configuration. A mounted light often becomes part of the retention interface, so compatibility must be verified.
The firearm should remain secured through normal daily movement while still allowing a consistent, intentional draw. Follow the holster maker’s adjustment instructions.
The holster—not just the firearm—must stay attached during the draw. Match clips, loops or hooks to the belt or support system they were designed to use.
The wearer should be able to establish a controlled grip before the firearm leaves the holster without digging fingers between the grip and body.
Clothing, drawstrings, toggles and other objects must be kept out of the holster. Reholster slowly and deliberately; if anything resists, stop.
Wedge, claw, ride height and cant are tuning tools. A wedge can change pressure and grip rotation, a claw can help rotate the grip toward the body, ride height changes access and bend-point interaction, and cant changes wrist angle and concealment. Adjust one variable at a time with an unloaded firearm.
Why fit is personal
A position that works for one person can fail for another. The goal is not to copy someone else’s clock position—it is to build a safe, repeatable system around your own movement and responsibilities.
Unfamiliar is not the same as harmful. A new belt and holster may feel noticeable at first. Sharp pain, numbness, restricted breathing, loss of balance or symptoms that persist are different. Stop using the setup and consult an appropriate qualified professional when health or injury is involved.
The unloaded fit test
Use the firearm manufacturer’s unloading procedure, remove ammunition from the test area and keep the muzzle in a safe direction. If you are not confident performing the test safely, complete it with a qualified instructor.
Safety and Texas law
Texas carry law distinguishes between concealed and openly carried handguns, addresses prohibited places and recognizes legally effective notice from property owners. Laws, exceptions and signage requirements can change. Review current Texas DPS materials and the current statutes rather than relying on an old article or social-media summary.
This page is a fit and safety guide—not legal advice. Eligibility, location restrictions, property notice, travel and reciprocity are separate questions. A Texas License to Carry also provides benefits beyond basic permitless-carry eligibility.
Frequently asked questions
There is no universal best position. Appendix and strong-side carry are common starting points, but body shape, mobility, firearm size, clothing, daily movement and the exact holster can make another position more usable. The right system must protect the trigger, retain the handgun and support safe, repeatable access.
Appendix carry can be performed safely with a properly fitted holster, complete trigger coverage, reliable attachment and disciplined handling. Because placement makes muzzle and reholstering errors especially consequential, use an unloaded firearm for fitting, keep clothing and objects out of the holster, and reholster slowly under qualified instruction.
Strong-side 3 o’clock often gives direct access but may press on the widest part of the hip. Moving behind the hip may improve standing comfort and concealment, while making seated access and visual control more difficult. Small placement changes can matter more than the category name.
Small-of-back carry can hide the handgun from some angles, but it makes access and visual control difficult and can place the firearm against the spine during sitting or a fall. Compare whether another position provides similar concealment with better control and less body-contact risk.
Many belt-mounted holsters work best with a belt designed to support their weight and attachment method. Some chassis, belly-band, pocket, ankle and off-body systems do not use a conventional belt, but they still require stable support, trigger protection and dependable retention.
Stop using the setup and remove the firearm safely. Reevaluate position, ride height, cant, wedge, belt tension, firearm size and holster shape. Sharp pain, numbness, restricted breathing or persistent symptoms should not be treated as a normal break-in period; health or injury concerns belong with an appropriate qualified professional.
No. Use a purpose-built system that fully protects the trigger and controls the firearm. A carry pocket should contain nothing else. Off-body carriers need a dedicated secured compartment and must remain under the carrier’s direct control.
Check the setup in your normal clothing while standing, walking, reaching, bending and sitting. Use mirrors or a trusted training partner rather than repeatedly touching or adjusting the firearm in public. Printing is affected by grip length, garment drape, belt tension, ride height, cant and body position.
Private instruction gives you time to evaluate safe handling, access, garment clearance, movement and holster fit around your experience, goals and pace.
Information